
Put all this into an MSI
To create an MSI that will let you distribute your extension, you will need 2 things :
- Wix Toolset ( freely available here => http://wixtoolset.org/ )
- And MSIExt that will bring few features not natively available in “Wix Toolset” but are mandatory for us. (here => http://dblock.github.io/msiext/ )
Even if we will create the simplest MSI possible (no wizard), this will be the longest part of this tutorial so please read it entirely before starting.
First, download and install Wix toolset (it will be integrated into VisualStudio so don’t forget to close it before installing), then download and unzip it wherever you want.
Re-open your VisualStudio project and add a new project (simple as File/Add/New project)
Choose “Windows Installer XML” and select a “Setup Project”
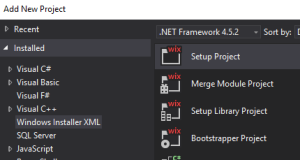
Don’t forget to give it a nice name before validating (I will simply name it “myExtSetup” here)
A template is automatically created.
If you want to understand every item it contains and how to make it reflect more your will, follow the tutorial provided on the Wix Toolset web site. This tutorial is really clear and simple to understand, I can’t do better (https://www.firegiant.com/wix/tutorial/)
Before start, we need to link the setup project with our dll project.
Right-click on the setup project “References” item and choose “Add Reference…”.
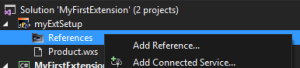
Select the “Project” tab, highlight your project, Add it and close this window.
Let’s look the first segment:
<Product Id="*" Name="myExtSetup" Language="1033" Version="1.0.0.0" Manufacturer="" UpgradeCode="99ff1cbe-xxxx-xxxx-xxxx-6913cf65xxxx">
   <Package InstallerVersion="200" Compressed="yes" InstallScope="perMachine" />

   <MajorUpgrade DowngradeErrorMessage="A newer version of [ProductName] is already installed." />
   <MediaTemplate />
   <Feature Id="ProductFeature" Title="myExtSetup" Level="1">
      <ComponentGroupRef Id="ProductComponents" />
   </Feature>
</Product>
These are general information about your MSI. Change the Name and the Manufacturer as you want but keep everything else as-is for now.
Note that Id=”*” means that product Id will be automatically generated on build time. You don’t have to care about it. Upgrade code is much more important as this will be the key in case of multiple releases. If you keep the upgrade code unchanged and increment the Version number, you will be able to handle correctly automatic version replacement.
Remember, our extension, like the console, is only 32bits. So add the Platform=”x86″ property to the “Package” tag like this:
<Package InstallerVersion="200" Compressed="yes" InstallScope="perMachine" Platform="x86" />
If you want your installer to include all file in a single MSI file ( by opposition to an MSI with separate Cab files) modify “MediaTemplate” like this :
<MediaTemplate /> => <MediaTemplate EmbedCab="yes" />
A brief explanation about features and Components:
- every single object (like a file or a registry key) are components.
- Components can be grouped in a ComponentGroup
- A feature is a group of components that must be installed at once. This is what is presented to the user during a common install sequence to let them choose what they want. Components can be shared between different Features.
We will create simple MSI with no graphical interface. As users won’t have any choice to make, a ingle feature will be enough.
Change this section to something more adapted like :
<Feature Id="MyDeviceExt" Title="Device Right click extension" Level="1">
   <ComponentGroupRef Id="ProductComponents" />
</Feature>
Let the “ComponentGroupRef” as-is for now. We will change it later.
Then comes the directory section:
<Fragment>
   <Directory Id="TARGETDIR" Name="SourceDir">
      <Directory Id="ProgramFilesFolder">
         <Directory Id="INSTALLFOLDER" Name="myExtSetup" />
      </Directory>
   </Directory>
</Fragment>
This will create a “myExtSetup” folder under “program Files(x86)” (remember the platform property). Let’s change that to create first a folder with our company name then a subfolder for our extension:
<Fragment>
   <Directory Id="TARGETDIR" Name="SourceDir">
      <Directory Id="ProgramFilesFolder">
         <Directory Id="NOBUR_INC" Name="Nobur inc." >
            <Directory Id="INSTALLFOLDER" Name="Sccm Device Extension" />
         </Directory>
      </Directory>
   </Directory>
</Fragment>
When choosing an Id, don’t forget they must :
- be unique in the file
- contains only alphanumerical characters and underscores (_). Spaces are forbidden.
- never start with a number
Now the last part of the file.
<Fragment>
   <ComponentGroup Id="ProductComponents" Directory="INSTALLFOLDER">
      <!-- TODO: Remove the comments around this Component element and the ComponentRef below in order to add resources to this installer. -->
      <!-- <Component Id="ProductComponent"> -->
      <!-- TODO: Insert files, registry keys, and other resources here. -->
      <!-- </Component> -->
  </ComponentGroup>
</Fragment>
There we add our dll like this :
<Fragment>
   <ComponentGroup Id="deviceExtComponents" Directory="INSTALLFOLDER">
      <Component Id="deviceExtdll">
         <File Source="$(var.MyFirstExtension.TargetPath)" DiskId="1"/>
      </Component>
   </ComponentGroup>
</Fragment>
This instructs Wix to place the file generated in the “MyFirstExtension” project (represented by this variable: $(var.MyFirstExtension.TargetPath)) into the folder identified by “INSTALLFOLDER”. As we embed all the files into a unique MSI, you don’t have to care about the DiskId=”1″ parameter.
Go back to the feature list and change the id of the componentGroupRef to reflect our new componentGroup Id
<ComponentGroupRef Id="deviceExtComponents" />
Now, if you build this solution you will get a working MSI file that will deploy your Dll. This is not enough as we also need to deploy 2 XML files into the console directory.
This is much harder than what we already did. Are you ready?
First, we need to include our XML extension file into our project. Right-click on the “MyFirstExtension” project then select “Add” => “Existing Item…”. Browse your disk to the place you saved our extension XML and add it. Now that is has been imported, rename it to mark it as a template:
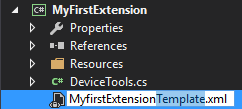
We will modify it a little to make more flexible (remember that the path to our dll in hardly coded into it). Double click on it to start edition and replace all the path targeting our Dll by something like a tag.
My file will look like something like this:
<ActionDescription Class="AssemblyType" DisplayName="show collections" MnemonicDisplayName="show collections" Description="Shows the list of collection IDs this device is member of">
   <ImagesDescription>
      <ResourceAssembly>
         <Assembly>[INSTALLFLD]MyFirstExtension.dll</Assembly>
         <Type>MyFirstExtension.Properties.Resources.resources</Type>
      </ResourceAssembly>
      <ImageResourceName>collinfo</ImageResourceName>
   </ImagesDescription>
   <ShowOn>
      <string>ContextMenu</string>
      <string>DefaultHomeTab</string>
   </ShowOn>
   <ActionAssembly>
      <Assembly>[INSTALLFLD]MyFirstExtension.dll</Assembly>
      <Type>MyFirstExtension.DeviceTools</Type>
      <Method>deviceCollections</Method>
   </ActionAssembly>
……
Save it!
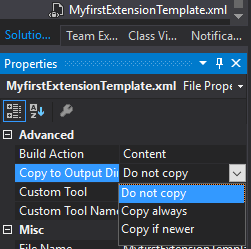
On the bottom right of the screen (in the property pane), change “copy to output dir” option to “Copy if newer” to be sure this file will be accessible from our setup project
There is where MSIExt comes into the show. We will use the MSIExt template feature to replace “on the fly” our “INSTALLFLD” flag with the correct path during installation.
Right-click on your setup project to add an existing file and browse to where you previously unzip MSIExt. Open the “WixExtensions” subfolder, change the filter to “*.*” and add WixSystemToolsExtension.dll.
Now that Wix’s extension is included in your project, add a reference to it (right-click on references, then “Add Reference….”) And select the file you just imported (the one in your project folder!)
MSIExt doesn’t provide XSD files in their distribution archive. That is not mandatory but makes work easier as it prevents notice messages during building and, moreover, provides auto-completion info to IntelliSense.
Luckily, this is an opensource project and XSD files are available on GitHub. I’ve already extracted those from version 1.5 for you and place them into this Zip archive.
MSIExt1.5-xsd (zip archive)
Add the corresponding SystemTools.xsd file to your setup project. Open the product.wxs file for edition select “Schemas…” in the XML menu.
And add the freshly imported XSD.
Finally, add the XML namespace for this extension in our XML file like this :
<Wix xmlns="http://schemas.microsoft.com/wix/2006/wi" xmlns:SystemTools="http://schemas.appsecinc.com/wix/SystemToolsExtension">
Now that everything is ready, let’s modify the WXS file!
In the Product section, just after the features, let an empty line and add:
<Condition Message="You need to be an administrator to install this product.">
   Privileged
</Condition>
I will not explain that. I think you already understand what it means ^^
Let another empty line then add :
<Property Id="UIFOLDER" Secure="yes">
   <RegistrySearch Id="SccmUiFolder" Root="HKLM" Key="SOFTWARE\Microsoft\ConfigMgr10\Setup" Name="UI Installation Directory" Type="directory" />
</Property>
Quite simple also! This will search the registry for the SCCM console installation folder and place the result into a Property named “UIFOLDER”.
<Property Id="XMLSTORAGE" Secure="yes">
   <DirectorySearch Id="CheckSubDir" Path="[UIFOLDER]" Depth="0">
      <DirectorySearch Id="xml_storage_search" Path="XmlStorage" Depth="5" />
   </DirectorySearch>
</Property>
We already found the console installation path, this will search inside the tree the XmlStorage subfolder and place it into the “XMLSTORAGE” property.
Now we can describe the directory structure of the SCCM console installation.
<Fragment>
   <Directory Id="TARGETDIR" Name="SourceDir">
      <Directory Id="ProgramFilesFolder">
         <Directory Id="NOBUR_INC" Name="Nobur inc." >
            <Directory Id="INSTALLFOLDER" Name="Sccm Device Extension" />
         </Directory>
         <Directory Id="XMLSTORAGE" Name="XMLSTORAGE">
            <Directory Id="EXTENSIONS" Name="Extensions">
               <Directory Id="ACTIONS" Name="Actions">
                  <Directory Id="_FD01CD1_9E01_461E_92CD_94866B8D1F39" Name="3fd01cd1-9e01-461e-92cd-94866b8d1f39" />
                  <Directory Id="ED9DEE86_EADD_4AC8_82A1_7234A4646E62" Name="ed9dee86-eadd-4ac8-82a1-7234a4646e62" />
               </Directory>
            </Directory>
         </Directory>
      </Directory>
   </Directory>
</Fragment>
A directory XMLSTORAGE having the same Id that the property containing the XmlStorage path. Inside an “Extensions” folder containing an “Actions” folder with a GUID folder within.
Note the IDs of GUID folders: I simply uppercase all letters and replace dashes (-) with underscores (as dashes are not allowed in IDs). Note also that the first one starts with a number so I had to replace it with an underscore too.
Add a new component in a new componentGroup. We can’t use the actual componentGroup because all the files will not reside in the same folder tree.
<ComponentGroup Id="deviceExtxmlComponents">
   <Component Id="ext_xml_1" Directory="_FD01CD1_9E01_461E_92CD_94866B8D1F39">
      <File Id="XmlTemplate1" Source="$(var.MyFirstExtension.TargetDir)MyfirstExtensionTemplate.xml" Name="MyfirstExtension.xml" DiskId="1" />
      <SystemTools:TemplateFile Id="fileTemplateProcessXml1" Source="[#XmlTemplate1]" Target="[#XmlTemplate1]" ExecuteOnInstall="yes">
         <SystemTools:TemplateFileProperty Id="INSTALLDIR_property" Name="INSTALLFLD" Value="[INSTALLDIR]" />
      </SystemTools:TemplateFile>
   </Component>
</ComponentGroup>
This requires some explanation. This define a new component named ext_xml_1 that will be installed in 3fd01cd1-9e01-461e-92cd-94866b8d1f39 folder. It is composed of a file (id XmlTemplate1) that must be taken from the build output folder of the MyFirstExtension project, named MyfirstExtensionTemplate.xml and will be renamed MyfirstExtension.xml at installation time.
Here comes the SystemTools WixExtension. We will use the file identified by id=XmlTemplate1 as a template (Source=”[#XmlTemplate1]”) and place the result of processing in the same file (in-place) (Target=”[#XmlTemplate1]”). This is only required during installation so : ExecuteOnInstall=”yes”
In this file, we will replace all reference to INSTALLFLD property (Name=”INSTALLFLD”) with the content of the INSTALLDIR property (Value=”[INSTALLDIR]”)
Now duplicate this to proceed with the second xml file :
<ComponentGroup Id="deviceExtxmlComponents">
   <Component Id="ext_xml_1" Directory="_FD01CD1_9E01_461E_92CD_94866B8D1F39">
      <File Id="XmlTemplate1" Source="$(var.MyFirstExtension.TargetDir)MyfirstExtensionTemplate.xml" Name="MyfirstExtension.xml" DiskId="1" />
      <SystemTools:TemplateFile Id="fileTemplateProcessXml1" Source="[#XmlTemplate1]" Target="[#XmlTemplate1]" ExecuteOnInstall="yes">
         <SystemTools:TemplateFileProperty Id="INSTALLDIR_property" Name="INSTALLFLD" Value="[INSTALLDIR]" />
      </SystemTools:TemplateFile>
   </Component>
   <Component Id="ext_xml_2" Directory="ED9DEE86_EADD_4AC8_82A1_7234A4646E62">
      <File Id="XmlTemplate2" Source="$(var.MyFirstExtension.TargetDir)MyfirstExtensionTemplate.xml" Name="MyfirstExtension.xml" DiskId="1" />
      <SystemTools:TemplateFile Id="fileTemplateProcessXml2" Source="[#XmlTemplate2]" Target="[#XmlTemplate2]" ExecuteOnInstall="yes">
         <SystemTools:TemplateFileProperty Id="INSTALLDIR_property" Name="INSTALLFLD" Value="[INSTALLDIR]" />
      </SystemTools:TemplateFile>
   </Component>
</ComponentGroup>
Don’t forget that Id must always be unique!
Last step: add this componentGroup to our feature and that’s all !!
<Feature Id="MyDeviceExt" Title="Device Right click extension" Level="1">
   <ComponentGroupRef Id="deviceExtComponents" />
   <ComponentGroupRef Id="deviceExtXmlComponents" />
</Feature>
A common error on compilation time is:

Surely due to the fact that our two project doesn’t have the same target architecture. Set x86 Architecture for release and debug targets in both projects then rebuild.
Don’t forget to update the version number in the WXS file before each release. Without this, you will not be able to replace the previously installed version (it will complain that the product is already installed)